afl-white-paper
AFL While Paper
![]()
This document provides a detailed code explanation of American Fuzzy lop.
Contents
- Main()
- Code Instrumentation
- Fork Server
- Shared Memory
- Branch Coverage Information
- Trace_bits and Buckets
- Mutation
Text
Main()
事实上,
while ((opt = getopt(argc, argv, "+i:o:f:m:t:T:dnCB:S:M:x:Q")) > 0)
  switch(opt){...
}
代码片段的功能是从用户terminal输入中找到-i -t …等配置,如何配置 afl 参考
main() 函数中fuzzing work 的预备工作
cull_queue();                                       /* The second part of the mechanism discussed above is a routine that goes over top_rated[] entries, and then sequentially grabs winners for previously-unseen bytes (temp_v) and marks them as favored, at least until the next run. The favored entries are given more air time during all fuzzing steps. */

  show_init_stats();                   /* Display quick statistics at the end of processing  the input directory,plus a bunch of warnings. Some calibration stuff also ended up here, along with several hardcoded constants. Maybe clean up eventually.*/

  seek_to = find_start_position();  /*  When resuming, try to find the queue position to  start from. This makes sense only when resuming,  and when we can find the original fuzzer_stats. */
ain() 函数中的核心部分:fuzz_one()函数
static volatile u8 stop_soon, /* Ctrl-C pressed? */
while (1) {

    u8 skipped_fuzz;

    cull_queue();

    if (!queue_cur) {

      queue_cycle++;
      current_entry     = 0;
      cur_skipped_paths = 0;
      queue_cur         = queue;

      while (seek_to) {
        current_entry++;
        seek_to--;
        queue_cur = queue_cur->next;
      }

      show_stats();

      if (not_on_tty) {
        ACTF("Entering queue cycle %llu.", queue_cycle);
        fflush(stdout);
      }

      /* If we had a full queue cycle with no new finds, try
         recombination strategies next. */

      if (queued_paths == prev_queued) {

        if (use_splicing) cycles_wo_finds++; else use_splicing = 1;

      } else cycles_wo_finds = 0;

      prev_queued = queued_paths;

      if (sync_id && queue_cycle == 1 && getenv("AFL_IMPORT_FIRST"))
        sync_fuzzers(use_argv);

    }

    skipped_fuzz = fuzz_one(use_argv);

    if (!stop_soon && sync_id && !skipped_fuzz) {

      if (!(sync_interval_cnt++ % SYNC_INTERVAL))
        sync_fuzzers(use_argv);

    }

    if (!stop_soon && exit_1) stop_soon = 2;

    if (stop_soon) break;

    queue_cur = queue_cur->next;
    current_entry++;
  }
stop_soon =1 如果用户terminal 输入Ctrl+C 结束afl 的 fuzzing 过程; if(!queue_cur)缩进模块的功能是找到 queue 尾.
显而易见,while(1)中关键的功能在于fuzz_one() 函数。
Code Instrumentation
afl-gcc.c
这个文件用来编译源代码,其实际上是gcc的封装,在组装参数的时候可以看到,as_path是afl-as,查看gcc的参数可以看到-B是指定编译器,也就是说这里先把汇编码给了afl-as,看后者的代码会发现它也只是个真正as的wrapper,在源程序的汇编中插桩之后再传递给real as。
tmp = alloc_printf("%s/afl-as", dir);

    if (!access(tmp, X_OK)) {
      as_path = dir;
      ck_free(tmp);
      return;
    }
//......
cc_params[cc_par_cnt++] = "-B";
cc_params[cc_par_cnt++] = as_path;
Instrumentation through afl-as
这里有是插桩的核心部分,主要函数为add_instrumentation(),插桩完毕之后用fork起子进程调用真正的汇编器。下面源码中增加了注释,作者也提到了需要插桩的部分有条件跳转和基本块。其中R(MAP_SIZE)等同于random(2^16),这个是为每个桩分配独有的ID,根据碰撞概率一般不会重复。
static void add_instrumentation(void)
{

    //前面忽略,这个循环是核心

  while (fgets(line, MAX_LINE, inf)) {

    /* In some cases, we want to defer writing the instrumentation trampoline
       until after all the labels, macros, comments, etc. If we're in this
       mode, and if the line starts with a tab followed by a character, dump
       the trampoline now. */
    //这里猜测是在main函数等基本块之前插桩,`t`+alpha
    if (!pass_thru && !skip_intel && !skip_app && !skip_csect && instr_ok &&
        instrument_next && line[0] == 't' && isalpha(line[1])) {

      fprintf(outf, use_64bit ? trampoline_fmt_64 : trampoline_fmt_32,
              R(MAP_SIZE));

      instrument_next = 0;
      ins_lines++;

    }

    /* Output the actual line, call it a day in pass-thru mode. */
    //原样输出
    fputs(line, outf);

    //省略
    /* If we're in the right mood for instrumenting, check for function
       names or conditional labels. This is a bit messy, but in essence,
       we want to catch:

         ^main:      - function entry point (always instrumented)
         ^.L0:       - GCC branch label
         ^.LBB0_0:   - clang branch label (but only in clang mode)
         ^tjnz foo  - conditional branches

       ...but not:

         ^# BB#0:    - clang comments
         ^ # BB#0:   - ditto
         ^.Ltmp0:    - clang non-branch labels
         ^.LC0       - GCC non-branch labels
         ^.LBB0_0:   - ditto (when in GCC mode)
         ^tjmp foo  - non-conditional jumps

       Additionally, clang and GCC on MacOS X follow a different convention
       with no leading dots on labels, hence the weird maze of #ifdefs
       later on.

     */

    if (skip_intel || skip_app || skip_csect || !instr_ok ||
        line[0] == '#' || line[0] == ' ') continue;

    /* Conditional branch instruction (jnz, etc). We append the instrumentation
       right after the branch (to instrument the not-taken path) and at the
       branch destination label (handled later on). */
    //条件跳转
    if (line[0] == 't') {

      if (line[1] == 'j' && line[2] != 'm' && R(100) < inst_ratio) {

        fprintf(outf, use_64bit ? trampoline_fmt_64 : trampoline_fmt_32,
                R(MAP_SIZE));

        ins_lines++;

      }

      continue;

    }


    //这里把main_payload插入代码中(应该是位于代码段的尾部)
  if (ins_lines)
    fputs(use_64bit ? main_payload_64 : main_payload_32, outf);

  if (input_file) fclose(inf);
  fclose(outf);

  if (!be_quiet) {

    if (!ins_lines) WARNF("No instrumentation targets found%s.",
                          pass_thru ? " (pass-thru mode)" : "");
    else OKF("Instrumented %u locations (%s-bit, %s mode, ratio %u%%).",
             ins_lines, use_64bit ? "64" : "32",
             getenv("AFL_HARDEN") ? "hardened" :
             (sanitizer ? "ASAN/MSAN" : "non-hardened"),
             inst_ratio);

  }

}
下面着重分析汇编代码的逻辑,汇编代码位于afl-as.h头文件中(以32位代码为例,64位功能相同),其中trampoline_fmt_32是一个调用代码,main_payload_32是完整的代码,下面的代码不难分析,前面保存了寄存器的值,ecx存储了格式化字符串,这个%08x对应的是之前提到的随机数,其作用是标识每一个插桩节点。
static const u8* trampoline_fmt_32 =

  "\n"
  "/* --- AFL TRAMPOLINE (32-BIT) --- */\n"
  "\n"
  ".align 4\n"
  "\n"
  "leal -16(%%esp), %%esp\n"
  "movl %%edi, 0(%%esp)\n"
  "movl %%edx, 4(%%esp)\n"
  "movl %%ecx, 8(%%esp)\n"
  "movl %%eax, 12(%%esp)\n"
  "movl $0x%08x, %%ecx\n"
  "call __afl_maybe_log\n"
  "movl 12(%%esp), %%eax\n"
  "movl 8(%%esp), %%ecx\n"
  "movl 4(%%esp), %%edx\n"
  "movl 0(%%esp), %%edi\n"
  "leal 16(%%esp), %%esp\n"
  "\n"
  "/* --- END --- */\n"
  "\n";
核心函数为__afl_maybe_log,lahf作用是将EFLAGS 寄存器标志位加载到AH,seto为溢出置位,之后判断__afl_area_ptr是否为空,这个指针用来保存共享内存,如果不为空表明已经初始化完成了,直接进入__afl_store,这里首先把__afl_prev_loc(之前的我位置)同当前位置的key异或,保存在edi寄存器,之后当前的key右移一位,作为下一个的__afl_prev_loc,这个右移是一个很巧妙的设计,如果代码块的跳转为A->B或B->A,直接对两个Key异或结果是一样的,因此右移可以区分出一些特殊情况。下面那个incb代码中edx为map,edi为索引,即map表中对应的索引加一,表明一次hit。
如果之前的共享内存地址为空,就进入__afl_setup这个标签,如果__afl_setup_failure的值不为0(0为正常,非零异常),通过getenv($SHM_ENV_VAR)环境变量来获得共享内存的ID,如果不为空就调用atoi以及shmat,最终将这个地址存储在__afl_area_ptr中方便之后使用(不必再初始化),下面启动fork_server。
fork_server和fuzzer之间是通过管道通信的,在宏定义里可以看到默认的FORKSRV_FD为198,这里读管道为198,写管道为199。开始先通知fuzzer,之后在read处阻塞等待fuzzer的消息,得到fuzzer通知之后父进程fork出一个子进程,在这个子进程里会关闭与fuzzer通信的文件描述符,jmp到__afl_store记录下基本块的hit情况之后向后继续执行main函数。而父进程记录下刚才启动的子进程的pid发送给fuzzer并等待子进程执行完毕,子进程结束之后将其状态告知fuzzer。之后开始新一轮的等待。后面每次基本块都会执行__afl_maybe_log,但由于已经得到了共享内存的位置不会fork新的进程,之后只是记录基本块的跳转情况,这样就大大节约了资源。
至此,在目标程序的插桩代码基本分析完毕。
Instrumentation through afl-llvm-pass
for (auto &F : M) {
    for (auto &BB : F) {

      BasicBlock::iterator IP = BB.getFirstInsertionPt();
      IRBuilder<> IRB(&(*IP));

      if (AFL_R(100) >= inst_ratio) continue;

      /* Make up cur_loc */

      unsigned int cur_loc = AFL_R(MAP_SIZE);

      ConstantInt *CurLoc = ConstantInt::get(Int32Ty, cur_loc);

      /* Load prev_loc */

      LoadInst *PrevLoc = IRB.CreateLoad(AFLPrevLoc);
      PrevLoc->setMetadata(M.getMDKindID("nosanitize"), MDNode::get(C, None));
      Value *PrevLocCasted = IRB.CreateZExt(PrevLoc, IRB.getInt32Ty());

      /* Load SHM pointer */

      LoadInst *MapPtr = IRB.CreateLoad(AFLMapPtr);
      MapPtr->setMetadata(M.getMDKindID("nosanitize"), MDNode::get(C, None));
      Value *MapPtrIdx =
          IRB.CreateGEP(MapPtr, IRB.CreateXor(PrevLocCasted, CurLoc));

      /* Update bitmap */

      LoadInst *Counter = IRB.CreateLoad(MapPtrIdx);
      Counter->setMetadata(M.getMDKindID("nosanitize"), MDNode::get(C, None));
      Value *Incr = IRB.CreateAdd(Counter, ConstantInt::get(Int8Ty, 1));
      IRB.CreateStore(Incr, MapPtrIdx)
          ->setMetadata(M.getMDKindID("nosanitize"), MDNode::get(C, None));

      /* Set prev_loc to cur_loc >> 1 */

      StoreInst *Store =
          IRB.CreateStore(ConstantInt::get(Int32Ty, cur_loc >> 1), AFLPrevLoc);
      Store->setMetadata(M.getMDKindID("nosanitize"), MDNode::get(C, None));

      inst_blocks++;

    }
}
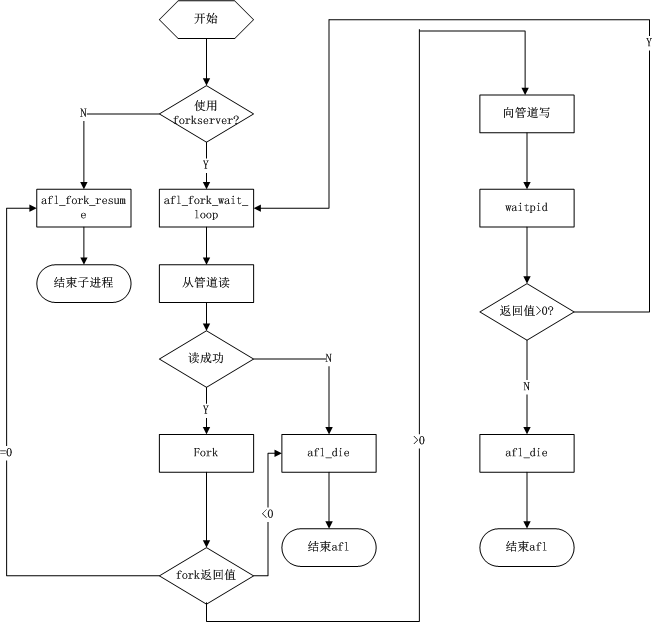
Fork Server
AFL 采用 forkserver 技术,只需进行一次 execve() 函数执行,之后的 fuzz 进程通过写时拷⻉技术从已经停止的 fuzz 进程镜像直接拷⻉。AFL主要是在对代码进行插桩时,将forkserver的汇编代码插入目标程序中执行,汇编代码与流程图如下:
 "__afl_forkserver:\n"
  "\n"
  "  /* Enter the fork server mode to avoid the overhead of execve() calls. We\n"
  "     push rdx (area ptr) twice to keep stack alignment neat. */\n"
  "\n"
  "  pushq %rdx\n"
  "  pushq %rdx\n"
  "\n"
  "  /* Phone home and tell the parent that we're OK. (Note that signals with\n"
  "     no SA_RESTART will mess it up). If this fails, assume that the fd is\n"
  "     closed because we were execve()d from an instrumented binary, or because\n"
  "     the parent doesn't want to use the fork server. */\n"
  "\n"
  "  movq $4, %rdx               /* length    */\n"
  "  leaq __afl_temp(%rip), %rsi /* data      */\n"
  "  movq $" STRINGIFY((FORKSRV_FD + 1)) ", %rdi       /* file desc */\n"
  CALL_L64("write")
  "\n"
  "  cmpq $4, %rax\n"
  "  jne  __afl_fork_resume\n"
  "\n"
  "__afl_fork_wait_loop:\n"
  "\n"
  "  /* Wait for parent by reading from the pipe. Abort if read fails. */\n"
  "\n"
  "  movq $4, %rdx               /* length    */\n"
  "  leaq __afl_temp(%rip), %rsi /* data      */\n"
  "  movq $" STRINGIFY(FORKSRV_FD) ", %rdi             /* file desc */\n"
  CALL_L64("read")
  "  cmpq $4, %rax\n"
  "  jne  __afl_die\n"
  "\n"
  "  /* Once woken up, create a clone of our process. This is an excellent use\n"
  "     case for syscall(__NR_clone, 0, CLONE_PARENT), but glibc boneheadedly\n"
  "     caches getpid() results and offers no way to update the value, breaking\n"
  "     abort(), raise(), and a bunch of other things :-( */\n"
  "\n"
  CALL_L64("fork")
  "  cmpq $0, %rax\n"
  "  jl   __afl_die\n"
  "  je   __afl_fork_resume\n"
  "\n"
  "  /* In parent process: write PID to pipe, then wait for child. */\n"
  "\n"
  "  movl %eax, __afl_fork_pid(%rip)\n"
  "\n"
  "  movq $4, %rdx                   /* length    */\n"
  "  leaq __afl_fork_pid(%rip), %rsi /* data      */\n"
  "  movq $" STRINGIFY((FORKSRV_FD + 1)) ", %rdi             /* file desc */\n"
  CALL_L64("write")
  "\n"
  "  movq $0, %rdx                   /* no flags  */\n"
  "  leaq __afl_temp(%rip), %rsi     /* status    */\n"
  "  movq __afl_fork_pid(%rip), %rdi /* PID       */\n"
  CALL_L64("waitpid")
  "  cmpq $0, %rax\n"
  "  jle  __afl_die\n"
  "\n"
  "  /* Relay wait status to pipe, then loop back. */\n"
  "\n"
  "  movq $4, %rdx               /* length    */\n"
  "  leaq __afl_temp(%rip), %rsi /* data      */\n"
  "  movq $" STRINGIFY((FORKSRV_FD + 1)) ", %rdi         /* file desc */\n"
  CALL_L64("write")
  "\n"
  "  jmp  __afl_fork_wait_loop\n"
  "\n"
  "__afl_fork_resume:\n"
  "\n"
  "  /* In child process: close fds, resume execution. */\n"
  "\n"
  "  movq $" STRINGIFY(FORKSRV_FD) ", %rdi\n"
  CALL_L64("close")
其中一个关键的点就是这个forkserver架构,在alf-fuzz中先起了一个fork-server,在这个fork出的子进程里调用了execve去执行二进制程序,然后结合afl-as的代码可以看到插桩的桩代码中也包含了fork函数的调用,这样的话就是fuzzer->forkserver->exec target Bin->bin->bin_sub_process(被fuzz的app),这样看起来fuzzer是最终被fuzz的程序的祖祖父进程,但是execve根据我们之前的介绍是直接将创建的进程替换掉原进程的,除非出错否则不会返回,因此实际上forkserver与target bin可以看作是同一个进程的不同程序,其父进程都是fuzzer,故最终的调用关系是下面这样的
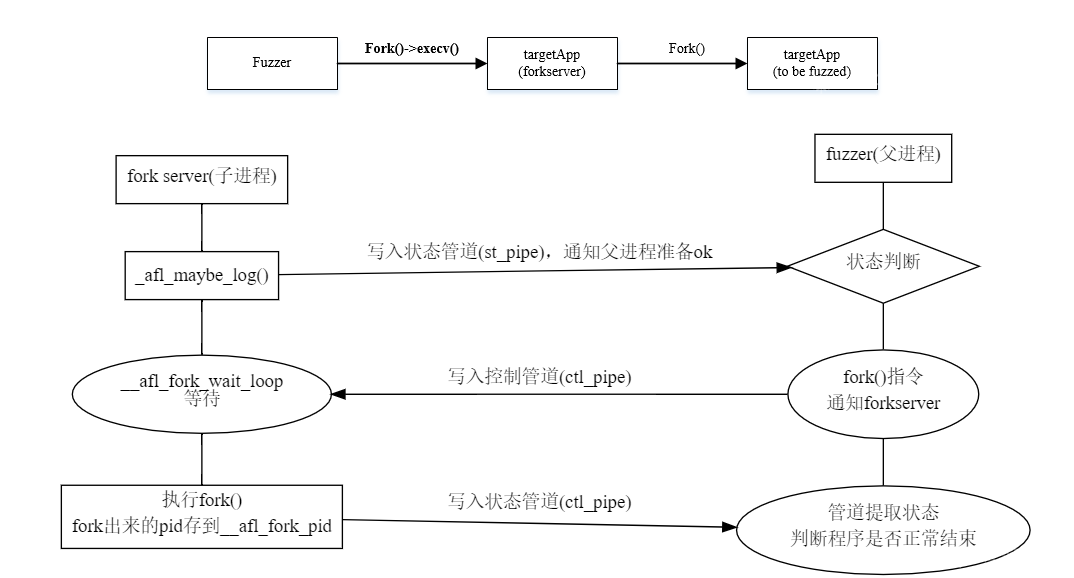
编译target完成后,就可以通过afl-fuzz开始fuzzing了。其大致思路是,对输入的seed文件不断地变化,并将这些mutated input喂给target执行,检查是否会造成崩溃。因此,fuzzing涉及到大量的fork和执行target的过程。
为了更高效地进行上述过程,AFL实现了一套fork server机制。其基本思路是:启动target进程后,target会运行一个fork server;fuzzer并不负责fork子进程,而是与这个fork server通信,并由fork server来完成fork及继续执行目标的操作。这样设计的最大好处,就是不需要调用execve(),从而节省了载入目标文件和库、解析符号地址等重复性工作。如果熟悉Android的话,可以将fork server类比为zygote。
接下来,我们来看看fork server的具体运行原理。首先,fuzzer执行fork()得到父进程和子进程,这里的父进程仍然为fuzzer,子进程则为target进程,即将来的fork server。
forksrv_pid = fork();
而父子进程之间,是通过管道进行通信。具体使用了2个管道,一个用于传递状态,另一个用于传递命令:
int st_pipe[2], ctl_pipe[2];
对于子进程(fork server),会进行一系列设置,其中包括将上述两个管道分配到预先指定的fd,并最终执行target:
  if (!forksrv_pid) {
...
    if (dup2(ctl_pipe[0], FORKSRV_FD) < 0) PFATAL("dup2() failed");
    if (dup2(st_pipe[1], FORKSRV_FD + 1) < 0) PFATAL("dup2() failed");
...
    execv(target_path, argv);
对于父进程(fuzzer),则会读取状态管道的信息,如果一切正常,则说明fork server创建完成。
  fsrv_st_fd  = st_pipe[0];
...
  rlen = read(fsrv_st_fd, &status, 4);
...
  /* If we have a four-byte "hello" message from the server, we're all set. Otherwise, try to figure out what went wrong. */

  if (rlen == 4) {
    OKF("All right - fork server is up.");
    return;
  }
接下来,我们来分析fork server是如何与fuzzer通信的。
fork server侧的具体操作,也是在之前提到的方法__afl_maybe_log()中。首先,通过写入状态管道,fork server会通知fuzzer,其已经准备完毕,可以开始fork了,而这正是上面提到的父进程等待的信息:
  "__afl_forkserver:\n"
  "\n"
  " /* Enter the fork server mode to avoid the overhead of execve() calls. */\n"
  "\n"
  " pushl %eax\n"
  " pushl %ecx\n"
  " pushl %edx\n"
  "\n"
  " /* Phone home and tell the parent that we're OK. (Note that signals with\n"
  " no SA_RESTART will mess it up). If this fails, assume that the fd is\n"
  " closed because we were execve()d from an instrumented binary, or because\n"
  " the parent doesn't want to use the fork server. */\n"
  "\n"
  " pushl $4 /* length */\n"
  " pushl $__afl_temp /* data */\n"
  " pushl $" STRINGIFY((FORKSRV_FD + 1)) " /* file desc */\n"
  " call write\n"
  " addl $12, %esp\n"
  "\n"
  " cmpl $4, %eax\n"
  " jne __afl_fork_resume\n"
接下来,fork server进入等待状态__afl_fork_wait_loop,读取命令管道,直到fuzzer通知其开始fork:
  "__afl_fork_wait_loop:\n"
  "\n"
  " /* Wait for parent by reading from the pipe. Abort if read fails. */\n"
  "\n"
  " pushl $4 /* length */\n"
  " pushl $__afl_temp /* data */\n"
  " pushl $" STRINGIFY(FORKSRV_FD) " /* file desc */\n"
  " call read\n"
一旦fork server接收到fuzzer的信息,便调用fork(),得到父进程和子进程:

  " call fork\n"
  "\n"
  " cmpl $0, %eax\n"
  " jl __afl_die\n"
  " je __afl_fork_resume\n"
子进程是实际执行target的进程,其跳转到__afl_fork_resume。在这里会关闭不再需要的管道,并继续执行:
  "__afl_fork_resume:\n"
  "\n"
  " /* In child process: close fds, resume execution. */\n"
  "\n"
  " pushl $" STRINGIFY(FORKSRV_FD) "\n"
  " call close\n"
  "\n"
  " pushl $" STRINGIFY((FORKSRV_FD + 1)) "\n"
  " call close\n"
  "\n"
  " addl $8, %esp\n"
  "\n"
  " popl %edx\n"
  " popl %ecx\n"
  " popl %eax\n"
  " jmp __afl_store\n"
父进程则仍然作为fork server运行,其会将子进程的pid通过状态管道发送给fuzzer,并等待子进程执行完毕;一旦子进程执行完毕,则再通过状态管道,将其结束状态发送给fuzzer;之后再次进入等待状态__afl_fork_wait_loop:
  " /* In parent process: write PID to pipe, then wait for child. */\n"
  "\n"
  " movl %eax, __afl_fork_pid\n"
  "\n"
  " pushl $4 /* length */\n"
  " pushl $__afl_fork_pid /* data */\n"
  " pushl $" STRINGIFY((FORKSRV_FD + 1)) " /* file desc */\n"
  " call write\n"
  " addl $12, %esp\n"
  "\n"
  " pushl $0 /* no flags */\n"
  " pushl $__afl_temp /* status */\n"
  " pushl __afl_fork_pid /* PID */\n"
  " call waitpid\n"
  " addl $12, %esp\n"
  "\n"
  " cmpl $0, %eax\n"
  " jle __afl_die\n"
  "\n"
  " /* Relay wait status to pipe, then loop back. */\n"
  "\n"
  " pushl $4 /* length */\n"
  " pushl $__afl_temp /* data */\n"
  " pushl $" STRINGIFY((FORKSRV_FD + 1)) " /* file desc */\n"
  " call write\n"
  " addl $12, %esp\n"
  "\n"
  " jmp __afl_fork_wait_loop\n"
以上就是fork server的主要逻辑,现在我们再回到fuzzer侧。在fork server启动完成后,一旦需要执行某个测试用例,则fuzzer会调用run_target()方法。在此方法中,便是通过命令管道,通知fork server准备fork;并通过状态管道,获取子进程pid:
    s32 res;

    /* In non-dumb mode, we have the fork server up and running, so simply tell it to have at it, and then read back PID. */

    if ((res = write(fsrv_ctl_fd, &prev_timed_out, 4)) != 4) {
...
    if ((res = read(fsrv_st_fd, &child_pid, 4)) != 4) {
...
随后,fuzzer再次读取状态管道,获取子进程退出状态,并由此来判断子进程结束的原因,例如正常退出、超时、崩溃等,并进行相应的记录。
    if ((res = read(fsrv_st_fd, &status, 4)) != 4) {
...
  /* Report outcome to caller. */

  if (WIFSIGNALED(status) && !stop_soon) {

    kill_signal = WTERMSIG(status);

    if (child_timed_out && kill_signal == SIGKILL) return FAULT_TMOUT;

    return FAULT_CRASH;

  }
Shared Memory
作为fuzzer,AFL并不是像无头苍蝇那样对输入文件无脑地随机变化(其实也支持这种方式,即dumb模式),其最大特点就是会对target进行插桩,以辅助mutated input的生成。具体地,插桩后的target,会记录执行过程中的分支信息;随后,fuzzer便可以根据这些信息,判断这次执行的整体流程和代码覆盖情况。
AFL使用共享内存,来完成以上信息在fuzzer和target之间的传递。具体地,fuzzer在启动时,会执行setup_shm()方法进行配置。其首先调用shemget()分配一块共享内存,大小MAP_SIZE为64K:
shm_id = shmget(IPC_PRIVATE, MAP_SIZE, IPC_CREAT | IPC_EXCL | 0600);
分配成功后,该共享内存的标志符会被设置到环境变量中,从而之后fork()得到的子进程可以通过该环境变量,得到这块共享内存的标志符:
shm_str = alloc_printf("%d", shm_id);
if (!dumb_mode) setenv(SHM_ENV_VAR, shm_str, 1);
并且,fuzzer本身,会使用变量trace_bits来保存共享内存的地址:
trace_bits = shmat(shm_id, NULL, 0);
在每次target执行之前,fuzzer首先将该共享内容清零:
memset(trace_bits, 0, MAP_SIZE);
接下来,我们再来看看target是如何获取并使用这块共享内存的。相关代码同样也在上面提到的方法__afl_maybe_log()中。首先,会检查是否已经将共享内存映射完成:
  " /* Check if SHM region is already mapped. */\n"
  "\n"
  " movl __afl_area_ptr, %edx\n"
  " testl %edx, %edx\n"
  " je __afl_setup\n"
__afl_area_ptr中保存的就是共享内存映射到target的内存空间中的地址,如果其不是NULL,便保存在ebx中继续执行;否则进一步跳转到__afl_setup。
__afl_setup处会做一些错误检查,然后获取环境变量AFL_SHM_ENV的内容并将其转为整型。查看其定义便可知,这里获取到的,便是之前fuzzer保存的共享内存的标志符。
  "__afl_setup:\n"
  "\n"
  " /* Do not retry setup if we had previous failures. */\n"
  "\n"
  " cmpb $0, __afl_setup_failure\n"
  " jne __afl_return\n"
  "\n"
  " /* Map SHM, jumping to __afl_setup_abort if something goes wrong.\n"
  " We do not save FPU/MMX/SSE registers here, but hopefully, nobody\n"
  " will notice this early in the game. */\n"
  "\n"
  " pushl %eax\n"
  " pushl %ecx\n"
  "\n"
  " pushl $.AFL_SHM_ENV\n"
  " call getenv\n"
  " addl $4, %esp\n"
  "\n"
  " testl %eax, %eax\n"
  " je __afl_setup_abort\n"
  "\n"
  " pushl %eax\n"
  " call atoi\n"
  " addl $4, %esp\n"
最后,通过调用shmat(),target将这块共享内存也映射到了自己的内存空间中,并将其地址保存在__afl_area_ptr及edx中。由此,便完成了fuzzer与target之间共享内存的设置。
  " pushl $0 /* shmat flags */\n"
  " pushl $0 /* requested addr */\n"
  " pushl %eax /* SHM ID */\n"
  " call shmat\n"
  " addl $12, %esp\n"
  "\n"
  " cmpl $-1, %eax\n"
  " je __afl_setup_abort\n"
  "\n"
  " /* Store the address of the SHM region. */\n"
  "\n"
  " movl %eax, __afl_area_ptr\n"
  " movl %eax, %edx\n"
  "\n"
  " popl %ecx\n"
  " popl %eax\n"
注记:如果使用了fork server模式,那么上述获取共享内存的操作,是在fork server中进行;随后fork出来的子进程,只需直接使用这个共享内存即可。
Branch Coverage Information
现在,用于通信的共享内存已准备完毕,接下来我们看看具体通信的是什么。
由官网文档可知,AFL是根据二元tuple(跳转的源地址和目标地址)来记录分支信息,从而获取target的执行流程和代码覆盖情况,其伪代码如下:
cur_location = <COMPILE_TIME_RANDOM>;
shared_mem[cur_location ^ prev_location]++;
prev_location = cur_location >> 1;
我们再回到方法__afl_maybe_log()中。上面提到,在target完成准备工作后,共享内存的地址被保存在寄存器edx中。随后执行以下代码:
  "__afl_store:\n"
  "\n"
  " /* Calculate and store hit for the code location specified in ecx. There\n"
  " is a double-XOR way of doing this without tainting another register,\n"
  " and we use it on 64-bit systems; but it's slower for 32-bit ones. */\n"
  "\n"
#ifndef COVERAGE_ONLY
  " movl __afl_prev_loc, %edi\n"
  " xorl %ecx, %edi\n"
  " shrl $1, %ecx\n"
  " movl %ecx, __afl_prev_loc\n"
#else
  " movl %ecx, %edi\n"
#endif /* ^!COVERAGE_ONLY */
  "\n"
#ifdef SKIP_COUNTS
  " orb $1, (%edx, %edi, 1)\n"
#else
  " incb (%edx, %edi, 1)\n"
这里对应的便正是文档中的伪代码。具体地,变量__afl_prev_loc保存的是前一次跳转的”位置”,其值与ecx做异或后,保存在edi中,并以edx(共享内存)为基址,对edi下标处进行加一操作。而ecx的值右移1位后,保存在了变量__afl_prev_loc中。
那么,这里的ecx,保存的应该就是伪代码中的cur_location了。回忆之前介绍代码插桩的部分:
static const u8* trampoline_fmt_32 =
...
  "movl $0x%08x, %%ecx\n"
  "call __afl_maybe_log\n"
在每个插桩处,afl-as会添加相应指令,将ecx的值设为0到MAP_SIZE之间的某个随机数,从而实现了伪代码中的
cur_location = <COMPILE_TIME_RANDOM>;。
因此,AFL为每个代码块生成一个随机数,作为其“位置”的记录;随后,对分支处的”源位置“和”目标位置“进行异或,并将异或的结果作为该分支的key,保存每个分支的执行次数。用于保存执行次数的实际上是一个哈希表,大小为MAP_SIZE=64K,当然会存在碰撞的问题;但根据AFL文档中的介绍,对于不是很复杂的目标,碰撞概率还是可以接受的:
   Branch cnt | Colliding tuples | Example targets
  ------------+------------------+-----------------
        1,000 | 0.75%            | giflib, lzo
        2,000 | 1.5%             | zlib, tar, xz
        5,000 | 3.5%             | libpng, libwebp
       10,000 | 7%               | libxml
       20,000 | 14%              | sqlite
       50,000 | 30%              | -
如果一个目标过于复杂,那么AFL状态面板中的map_density信息就会有相应的提示:
┬─ map coverage ─┴───────────────────────┤
│    map density : 3.61% / 14.13%        │
│ count coverage : 6.35 bits/tuple       │
┼─ findings in depth ────────────────────┤
这里的map density,就是这张哈希表的密度。可以看到,上面示例中,该次执行的哈希表密度仅为3.61%,即整个哈希表差不多有95%的地方还是空的,所以碰撞的概率很小。不过,如果目标很复杂,map density很大,那么就需要考虑到碰撞的影响了。此种情况下的具体处理方式可见官方文档。
另外,比较有意思的是,AFL需要将cur_location右移1位后,再保存到prev_location中。官方文档中解释了这样做的原因。假设target中存在A->A和B->B这样两个跳转,如果不右移,那么这两个分支对应的异或后的key都是0,从而无法区分;另一个例子是A->B和B->A,如果不右移,这两个分支对应的异或后的key也是相同的。
由上述分析可知,之前提到的共享内存,被用于保存一张哈希表,target在这张表中记录每个分支的执行数量。随后,当target执行结束后,fuzzer便开始对这张表进行分析,从而判断代码的执行情况。
Trace_bits and Buckets
首先,fuzzer对trace_bits(共享内存)进行预处理:
classify_counts((u32*)trace_bits);
具体地,target是将每个分支的执行次数用1个byte来储存,而fuzzer则进一步把这个执行次数归入以下的buckets中:
static const u8 count_class_lookup8[256] = {

  [0]           = 0,
  [1]           = 1,
  [2]           = 2,
  [3]           = 4,
  [4 ... 7]     = 8,
  [8 ... 15]    = 16,
  [16 ... 31]   = 32,
  [32 ... 127]  = 64,
  [128 ... 255] = 128

};
举个例子,如果某分支执行了1次,那么落入第2个bucket,其计数byte仍为1;如果某分支执行了4次,那么落入第5个bucket,其计数byte将变为8,等等。
这样处理之后,对分支执行次数就会有一个简单的归类。例如,如果对某个测试用例处理时,分支A执行了32次;对另外一个测试用例,分支A执行了33次,那么AFL就会认为这两次的代码覆盖是相同的。当然,这样的简单分类肯定不能区分所有的情况,不过在某种程度上,处理了一些因为循环次数的微小区别,而误判为不同执行结果的情况。
随后,对于某些mutated input来说,如果这次执行没有出现崩溃等异常输出,fuzzer还会检查其是否新增了执行路径。具体来说,是对trace_bits计算hash并来实现:
u32 cksum = hash32(trace_bits, MAP_SIZE, HASH_CONST);
通过比较hash值,就可以判断trace_bits是否发生了变化,从而判断此次mutated input是否带来了新路径,为之后的fuzzing提供参考信息。
Mutation
总的来讲,AFL维护了一个队列(queue),每次从这个队列中取出一个文件,对其进行大量变异,并检查运行后是否会引起目标崩溃、发现新路径等结果。变异的主要类型如下:
- bitflip,按位翻转,1变为0,0变为1
- arithmetic,整数加/减算术运算
- interest,把一些特殊内容替换到原文件中
- dictionary,把自动生成或用户提供的token替换/插入到原文件中
- havoc,中文意思是“大破坏”,此阶段会对原文件进行大量变异,具体见下文
- splice,中文意思是“绞接”,此阶段会将两个文件拼接起来得到一个新的文件
其中,前四项bitflip, arithmetic, interest, dictionary是非dumb mode(-d)和主fuzzer(-M)会进行的操作,由于其变异方式没有随机性,所以也称为deterministic fuzzing;havoc和splice则存在随机性,是所有状况的fuzzer(是否dumb mode、主从fuzzer)都会执行的变异。
以下将对这些变异类型进行具体介绍。
bitflip
拿到一个原始文件,打头阵的就是bitflip,而且还会根据翻转量/步长进行多种不同的翻转,按照顺序依次为:
- bitflip 1/1,每次翻转1个bit,按照每1个bit的步长从头开始
- bitflip 2/1,每次翻转相邻的2个bit,按照每1个bit的步长从头开始
- bitflip 4/1,每次翻转相邻的4个bit,按照每1个bit的步长从头开始
- bitflip 8/8,每次翻转相邻的8个bit,按照每8个bit的步长从头开始,即依次对每个byte做翻转
- bitflip 16/8,每次翻转相邻的16个bit,按照每8个bit的步长从头开始,即依次对每个word做翻转
- bitflip 32/8,每次翻转相邻的32个bit,按照每8个bit的步长从头开始,即依次对每个dword做翻转
作为精妙构思的fuzzer,AFL不会放过每一个获取文件信息的机会。这一点在bitflip过程中就体现的淋漓尽致。具体地,在上述过程中,AFL巧妙地嵌入了一些对文件格式的启发式判断。
automatic token detection
在进行bitflip 1/1变异时,对于每个byte的最低位(least significant bit)翻转还进行了额外的处理:如果连续多个bytes的最低位被翻转后,程序的执行路径都未变化,而且与原始执行路径不一致(检测程序执行路径的方式可见上篇文章中“分支信息的分析”一节),那么就把这一段连续的bytes判断是一条token。
例如,PNG文件中用IHDR作为起始块的标识,那么就会存在类似于以下的内容:
........IHDR........
当翻转到字符I的最高位时,因为IHDR被破坏,此时程序的执行路径肯定与处理正常文件的路径是不同的;随后,在翻转接下来3个字符的最高位时,IHDR标识同样被破坏,程序应该会采取同样的执行路径。由此,AFL就判断得到一个可能的token:IHDR,并将其记录下来为后面的变异提供备选。
AFL采取的这种方式是非常巧妙的:就本质而言,这实际上是对每个byte进行修改并检查执行路径;但集成到bitflip后,就不需要再浪费额外的执行资源了。此外,为了控制这样自动生成的token的大小和数量,AFL还在config.h中通过宏定义了限制:
/* Length limits for auto-detected dictionary tokens: */

#define MIN_AUTO_EXTRA      3
#define MAX_AUTO_EXTRA      32

/* Maximum number of auto-extracted dictionary tokens to actually use in fuzzing
   (first value), and to keep in memory as candidates. The latter should be much
   higher than the former. */

#define USE_AUTO_EXTRAS     10

#define MAX_AUTO_EXTRAS     (USE_AUTO_EXTRAS * 10)
对于一些文件来说,我们已知其格式中出现的token长度不会超过4,那么我们就可以修改MAX_AUTO_EXTRA为4并重新编译AFL,以排除一些明显不会是token的情况。遗憾的是,这些设置是通过宏定义来实现,所以不能做到运行时指定,每次修改后必须重新编译AFL。
generate effector map
在进行bitflip 8/8变异时,AFL还生成了一个非常重要的信息:effector map。这个effector map几乎贯穿了整个deterministic fuzzing的始终。
具体地,在对每个byte进行翻转时,如果其造成执行路径与原始路径不一致,就将该byte在effector map中标记为1,即“有效”的,否则标记为0,即“无效”的。
这样做的逻辑是:如果一个byte完全翻转,都无法带来执行路径的变化,那么这个byte很有可能是属于”data”,而非”metadata”(例如size, flag等),对整个fuzzing的意义不大。所以,在随后的一些变异中,会参考effector map,跳过那些“无效”的byte,从而节省了执行资源。
由此,通过极小的开销(没有增加额外的执行次数),AFL又一次对文件格式进行了启发式的判断。看到这里,不得不叹服于AFL实现上的精妙。
不过,在某些情况下并不会检测有效字符。第一种情况就是dumb mode或者从fuzzer,此时文件所有的字符都有可能被变异。第二、第三种情况与文件本身有关:
/* Minimum input file length at which the effector logic kicks in: */

#define EFF_MIN_LEN         128

/* Maximum effector density past which everything is just fuzzed
   unconditionally (%): */

#define EFF_MAX_PERC        90
即默认情况下,如果文件小于128 bytes,那么所有字符都是“有效”的;同样地,如果AFL发现一个文件有超过90%的bytes都是“有效”的,那么也不差那10%了,大笔一挥,干脆把所有字符都划归为“有效”。
arithmetic
在bitflip变异全部进行完成后,便进入下一个阶段:arithmetic。与bitflip类似的是,arithmetic根据目标大小的不同,也分为了多个子阶段:
- arith 8/8,每次对8个bit进行加减运算,按照每8个bit的步长从头开始,即对文件的每个byte进行整数加减变异
- arith 16/8,每次对16个bit进行加减运算,按照每8个bit的步长从头开始,即对文件的每个word进行整数加减变异
- arith 32/8,每次对32个bit进行加减运算,按照每8个bit的步长从头开始,即对文件的每个dword进行整数加减变异
加减变异的上限,在
config.h中的宏ARITH_MAX定义,默认为35。所以,对目标整数会进行+1, +2, …, +35, -1, -2, …, -35的变异。特别地,由于整数存在大端序和小端序两种表示方式,AFL会贴心地对这两种整数表示方式都进行变异。
此外,AFL还会智能地跳过某些arithmetic变异。第一种情况就是前面提到的effector map:如果一个整数的所有bytes都被判断为“无效”,那么就跳过对整数的变异。第二种情况是之前bitflip已经生成过的变异:如果加/减某个数后,其效果与之前的某种bitflip相同,那么这次变异肯定在上一个阶段已经执行过了,此次便不会再执行。
interest
下一个阶段是interest,具体可分为:
- interest 8/8,每次对8个bit进替换,按照每8个bit的步长从头开始,即对文件的每个byte进行替换
- interest 16/8,每次对16个bit进替换,按照每8个bit的步长从头开始,即对文件的每个word进行替换
- interest 32/8,每次对32个bit进替换,按照每8个bit的步长从头开始,即对文件的每个dword进行替换
而用于替换的”interesting values”,是AFL预设的一些比较特殊的数:
static s8  interesting_8[]  = { INTERESTING_8 };
static s16 interesting_16[] = { INTERESTING_8, INTERESTING_16 };
static s32 interesting_32[] = { INTERESTING_8, INTERESTING_16, INTERESTING_32 };
这些数的定义在config.h文件中:
/* List of interesting values to use in fuzzing. */

#define INTERESTING_8 \
  -128,          /* Overflow signed 8-bit when decremented  */ \
  -1,            /*                                         */ \
   0,            /*                                         */ \
   1,            /*                                         */ \
   16,           /* One-off with common buffer size         */ \
   32,           /* One-off with common buffer size         */ \
   64,           /* One-off with common buffer size         */ \
   100,          /* One-off with common buffer size         */ \
   127           /* Overflow signed 8-bit when incremented  */

#define INTERESTING_16 \
  -32768,        /* Overflow signed 16-bit when decremented */ \
  -129,          /* Overflow signed 8-bit                   */ \
   128,          /* Overflow signed 8-bit                   */ \
   255,          /* Overflow unsig 8-bit when incremented   */ \
   256,          /* Overflow unsig 8-bit                    */ \
   512,          /* One-off with common buffer size         */ \
   1000,         /* One-off with common buffer size         */ \
   1024,         /* One-off with common buffer size         */ \
   4096,         /* One-off with common buffer size         */ \
   32767         /* Overflow signed 16-bit when incremented */

#define INTERESTING_32 \
  -2147483648LL, /* Overflow signed 32-bit when decremented */ \
  -100663046,    /* Large negative number (endian-agnostic) */ \
  -32769,        /* Overflow signed 16-bit                  */ \
   32768,        /* Overflow signed 16-bit                  */ \
   65535,        /* Overflow unsig 16-bit when incremented  */ \
   65536,        /* Overflow unsig 16 bit                   */ \
   100663045,    /* Large positive number (endian-agnostic) */ \
   2147483647    /* Overflow signed 32-bit when incremented */
可以看到,用于替换的基本都是可能会造成溢出的数。
与之前类似,effector map仍然会用于判断是否需要变异;此外,如果某个interesting value,是可以通过bitflip或者arithmetic变异达到,那么这样的重复性变异也是会跳过的。
dictionary
进入到这个阶段,就接近deterministic fuzzing的尾声了。具体有以下子阶段:
- user extras (over),从头开始,将用户提供的tokens依次替换到原文件中
- user extras (insert),从头开始,将用户提供的tokens依次插入到原文件中
- auto extras (over),从头开始,将自动检测的tokens依次替换到原文件中
其中,用户提供的tokens,是在词典文件中设置并通过-x选项指定的,如果没有则跳过相应的子阶段。
user extras (over)
对于用户提供的tokens,AFL先按照长度从小到大进行排序。这样做的好处是,只要按照顺序使用排序后的tokens,那么后面的token不会比之前的短,从而每次覆盖替换后不需要再恢复到原状。
随后,AFL会检查tokens的数量,如果数量大于预设的MAX_DET_EXTRAS(默认值为200),那么对每个token会根据概率来决定是否进行替换:
for (j = 0; j < extras_cnt; j++) {

      /* Skip extras probabilistically if extras_cnt > MAX_DET_EXTRAS. Also
         skip them if there's no room to insert the payload, if the token
         is redundant, or if its entire span has no bytes set in the effector
         map. */

      if ((extras_cnt > MAX_DET_EXTRAS && UR(extras_cnt) >= MAX_DET_EXTRAS) ||
          extras[j].len > len - i ||
          !memcmp(extras[j].data, out_buf + i, extras[j].len) ||
          !memchr(eff_map + EFF_APOS(i), 1, EFF_SPAN_ALEN(i, extras[j].len))) {

        stage_max--;
        continue;

      }
这里的UR(extras_cnt)是运行时生成的一个0到extras_cnt之间的随机数。所以,如果用户词典中一共有400个tokens,那么每个token就有200/400=50%的概率执行替换变异。我们可以修改MAX_DET_EXTRAS的大小来调整这一概率。
由上述代码也可以看到,effector map在这里同样被使用了:如果要替换的目标bytes全部是“无效”的,那么就跳过这一段,对下一段目标执行替换。
user extras (insert)
这一子阶段是对用户提供的tokens执行插入变异。不过与上一个子阶段不同的是,此时并没有对tokens数量的限制,所以全部tokens都会从原文件的第1个byte开始,依次向后插入;此外,由于原文件并未发生替换,所以effector map不会被使用。
这一子阶段最特别的地方,就是变异不能简单地恢复。之前每次变异完,在变异位置处简单取逆即可,例如bitflip后,再进行一次同样的bitflip就恢复为原文件。正因为如此,之前的变异总体运算量并不大。
但是,对于插入这种变异方式,恢复起来则复杂的多,所以AFL采取的方式是:将原文件分割为插入前和插入后的部分,再加上插入的内容,将这3部分依次复制到目标缓冲区中(当然这里还有一些小的优化,具体可阅读代码)。而对每个token的每处插入,都需要进行上述过程。所以,如果用户提供了大量tokens,或者原文件很大,那么这一阶段的运算量就会非常的多。直观表现上,就是AFL的执行状态栏中,”user extras (insert)”的总执行量很大,执行时间很长。如果出现了这种情况,那么就可以考虑适当删减一些tokens。
auto extras (over)
这一项与”user extras (over)”很类似,区别在于,这里的tokens是最开始bitflip阶段自动生成的。另外,自动生成的tokens总量会由USE_AUTO_EXTRAS限制(默认为10)
havoc
对于非dumb mode的主fuzzer来说,完成了上述deterministic fuzzing后,便进入了充满随机性的这一阶段;对于dumb mode或者从fuzzer来说,则是直接从这一阶段开始。
havoc,顾名思义,是充满了各种随机生成的变异,是对原文件的“大破坏”。具体来说,havoc包含了对原文件的多轮变异,每一轮都是将多种方式组合(stacked)而成:
- 随机选取某个bit进行翻转
- 随机选取某个byte,将其设置为随机的interesting value
- 随机选取某个word,并随机选取大、小端序,将其设置为随机的interesting value
- 随机选取某个dword,并随机选取大、小端序,将其设置为随机的interesting value
- 随机选取某个byte,对其减去一个随机数
- 随机选取某个byte,对其加上一个随机数
- 随机选取某个word,并随机选取大、小端序,对其减去一个随机数
- 随机选取某个word,并随机选取大、小端序,对其加上一个随机数
- 随机选取某个dword,并随机选取大、小端序,对其减去一个随机数
- 随机选取某个dword,并随机选取大、小端序,对其加上一个随机数
- 随机选取某个byte,将其设置为随机数
- 随机删除一段bytes
- 随机选取一个位置,插入一段随机长度的内容,其中75%的概率是插入原文中随机位置的内容,25%的概率是插入一段随机选取的数
- 随机选取一个位置,替换为一段随机长度的内容,其中75%的概率是替换成原文中随机位置的内容,25%的概率是替换成一段随机选取的数
- 随机选取一个位置,用随机选取的token(用户提供的或自动生成的)替换
- 随机选取一个位置,用随机选取的token(用户提供的或自动生成的)插入
怎么样,看完上面这么多的“随机”,有没有觉得晕?还没完,AFL会生成一个随机数,作为变异组合的数量,并根据这个数量,每次从上面那些方式中随机选取一个(可以参考高中数学的有放回摸球),依次作用到文件上。如此这般丧心病狂的变异,原文件就大概率面目全非了,而这么多的随机性,也就成了fuzzing过程中的不可控因素,即所谓的“看天吃饭”了。
splice
历经了如此多的考验,文件的变异也进入到了最后的阶段:splice。如其意思所说,splice是将两个seed文件拼接得到新的文件,并对这个新文件继续执行havoc变异。
具体地,AFL在seed文件队列中随机选取一个,与当前的seed文件做对比。如果两者差别不大,就再重新随机选一个;如果两者相差比较明显,那么就随机选取一个位置,将两者都分割为头部和尾部。最后,将当前文件的头部与随机文件的尾部拼接起来,就得到了新的文件。在这里,AFL还会过滤掉拼接文件未发生变化的情况。
cycle
于是乎,一个seed文件,在上述的全部变异都执行完成后,就…抱歉,还没结束。
上面的变异完成后,AFL会对文件队列的下一个进行变异处理。当队列中的全部文件都变异测试后,就完成了一个”cycle”,这个就是AFL状态栏右上角的”cycles done”。而正如cycle的意思所说,整个队列又会从第一个文件开始,再次进行变异,不过与第一次变异不同的是,这一次就不需要再进行deterministic fuzzing了。
当然,如果用户不停止AFL,那么seed文件将会一遍遍的变异下去。